| |
|
Click on a thumbnail picture below to see the full size version.
|
52 Entries.
|
|
Sunday, January 11
|
View Page
|
 |
BEWARE, THERE'S ICE OUT THERE! Patch-wise, I made good use of the frozen soil and the moderate layer of snow on top: Two days ago I added boron and molybdenum to the patch. HOW and WHY did I do that... Well, B and Mo should be added homogeneously...one should avoid creating spots with excessive B- or Mo-content. In principle, I could add them during fall patch prep, just before roto-tilling the patch. However, B and Mo get leached out rather easily, and I want the water to wash them in (...to the patch) rather than wash them out (into deeper layers of subsoil). Therefore, I took a barrel of water, added the amendments into a good load of water and sprinkled everything more or less homogeneously across the patch using a watering can (16 cans in total). The frozen soil was great for walking across the patch, the first layer of snow was great for further diluting the amendments, and the new snow from the past two days will also help to wash them in (as soon as it melts....probably over the course of the next two weeks, according to the forecast). Wishing you all a great start into a great pumpkin year, stay safe!
|
|
|
Sunday, March 8
|
View Page
|
 |
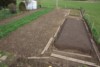
Today I dug a pit in my patch, not trying to find gold but to see the probably precious soil. About four years ago, I dug over the entire patch two spades deep, turning it upside down, moving the upper half (topsoil) a spade lower and the lower half (the sandy loam) on top, ready for being amended with compost and other good things. Now, about four years later, I was curious to see how things had developed. Good thing #1: As expected, I have found a layer of topsoil that is about two spades deep (50 cm). On the bottom you can see where the sandy loam starts. Good thing #2: The lower half is still pretty dark, even though it has not received any addition of compost over the past five years. Interesting thing #3: The lower half is still darker than the upper half. Apparently, there is a difference between 12 years of patch prep and 4 years of patch prep.
|
|
|
Monday, March 9
|
View Page
|
 |
One thing about spring that I really like: A green pumpkin patch. This year I will wait for another few weeks before patch prep will continue, I love to see that there are less weeds than the years before, so I will let the rye grow some deeper roots in the meantime. Also, soil temperature is still pretty low. Good enough for rye to grow, but not at a reasonable level as it would made any sense to sow another cover crop right now.
|
|
|
Monday, March 9
|
View Page
|
 |
Almost as good as a lush green pumpkin patch: Some first spring flowers :)
|
|
|
Monday, March 9
|
View Page
|
 |
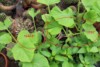
Back to the green side of life: The wild garlic, which is growing in a shady corner next to my home, is making me look forward to having the one or the other yummy meal with that great stuff :)
|
|
|
Saturday, March 21
|
View Page
|
 |
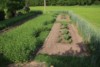
Patch today :) In spite of the many frosty nights and the rather cold soil (5 deg. Celsius), the rye keeps growing.
|
|
|
Saturday, March 21
|
View Page
|
 |
Today, I decided to dig another hole in the patch and extract some rye plants, wanted to see how and where their roots are going. Well, I am pretty sure the longest roots fell off the plants just by the weight of the soil attached, but at least some roots were friendly enough to tell me that the plants are digging their way down by more than 1 ft. For the next two weeks, the rye can continue to produce root mass, but then I need to do some next steps...prepare the planting sites and sow another cover crop (mustard) in some places.
|
|
|
Saturday, March 28
|
View Page
|
 |
Oh well, last week I thought I would let the rye grow for another two weeks, but now we have had such a nice sunny weekend and then a forecast of some rain, which sounds like the perfect time for getting the cover crop sown, and then the rain may give it a good start. Hence, my Saturday started with some mowing, followed by many many hours of further patch prep...
|
|
|
Sunday, March 29
|
View Page
|
 |
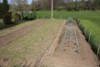
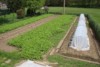
...and one day later, the cover crop (mustard) is sown in all the places where you can see the dirt, can-watered for just in case that there will not be as much rain as I am hoping for, and some prep of the planting sites has also begun.
|
|
|
Sunday, March 29
|
View Page
|
 |
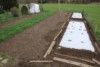
So, here is my plan for my 2026 patch layout. This year I want to grow 4 squash plants, and each plant will be contained in one of the four orange rectangles. The mustard-areas inside the rectangles will be free of mustard after beginning of June, so that the squash plants can use that space as well. The other cover crop areas will then grow another cover crop (tagetes, zinnias, and some other stuff). The long rye strip will be rye for another two weeks, and then there will be three rows of potatos. Last but not least, the rye leftovers inside the orange areas will be shaved off (1 - 2 inches thick) and will be piled up inside the blue rectangles. The blue-framed areas will then be covered with clear plastic for some weeks, they will be the planting sites this year.
|
|
|
Monday, March 30
|
View Page
|
 |
Next step accomplished :) (On top of the mounds, I have added some of the rye clippings as well as some alfalfa pellets.) Last step, the addition of a thin soil cover and clear plastic sheets, will be done during the next two weeks, I guess.
|
|
|
Friday, April 3
|
View Page
|
 |
Next (half) step finished, just need to do the 2nd mound in a similar manner ;)
|
|
|
Friday, April 3
|
View Page
|
 |
...and some hours later: the other part finished as well :)
|
|
|
Saturday, April 4
|
View Page
|
 |
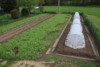
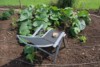
Parts of my patch will be working 'under cover' for the next couple of weeks.
|
|
|
Wednesday, April 8
|
View Page
|
 |
In principle, I turn the soil of my patch twice every year (using a spade), and the way I turn the soil depends on the purpose. In fall, just after removing the pumpkin plants and the weeds from the patch, I usually spread compost and other amendments, mix everything into the soil using a roto-tiller, and then I turn the soil by making use of the full depth of my spade (basically turning blocks of soil) before sowing the winter cover crop. In spring, when there is cover crop on top...and perhaps some weeds as well...I want to retain the structure in the deeper soil and I aim at turning the greenery upside down in a rather shallow but efficient manner. For that purpose, I do not turn blocks of soil, I turn shingles of soil, and it all happens the way shown in these five steps. Step 1: I use a mower to remove most of the cover crop.
|
|
|
Wednesday, April 8
|
View Page
|
 |
Step 2: Somewhere I need to start, and where I start with the procedure I turn the soil in the 'normal manner' turning blocks of soil (a spade deep), but I do it that way along one single row only.
|
|
|
Wednesday, April 8
|
View Page
|
 |
Step 3: For all of the next rows I turn shingles of soil. That means, I insert the spade into the soil at an angle of about 45 deg (shown in the first and second pic of this trio), and the front third of the spade reaches under the already turned row of soil (use your imagination...in the 2nd pic you can 'see' that the spade must reach under the already turned soil). The 3rd pic shows what it looks like when that particular shingle has been turned.
|
|
|
Wednesday, April 8
|
View Page
|
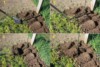 |
Step 4: Basically, this step goes hand in hand with step 3, but here I make it a bit more visible for you. As soon as I take such a 45 deg shingle out of the soil, from below the rim of the previous row, the rim collapses (and thus the greenery of the previous shingle, which is somewhere in this area, falls to a deeper level). For better visualization I have marked a shingle of the previous row with a green stake. So, I insert the spade at an angle of 45 deg (pics 1 and 2), and in pic 3 you can see the spade with the removed shingle as well as the collapsed rim of the previous row. Pic 4 gives you an impression that the 'mound', which results from that turning procedure, consists of the deeper part of the extracted and turned shingle (where there has not been any greenery, it was extracted from the lower soil areas below the previously turned row), and the upper part of the shingle (which contains the greenery) forms the rim of the current row, which will collapse and fall to a deeper level during the procedure of turning the next row of shingles.
|
|
|
Wednesday, April 8
|
View Page
|
 |
Step 5: Well, this is a simple thing...you just need to continue with that procedure row by row, enjoy the nice pattern of shingles of turned soil, occasionally flatten the mounds with a rake (carefully!!! because you don't want to dig out any parts of the previous cover crop) and occasionally have a drink... Cheers!
|
|
|
Tuesday, April 14
|
View Page
|
 |
Today I started the first couple of seeds. This year, my squash line-up will include seeds from 2021-2025, and I want to include one of those classic seeds before they get toooo ooold (...starting all four seeds, hoping for two seedlings...a favorite plant and back-up). Initially, I thought I would start the entire line-up on the same day (and I'm aware that I need to try to be patient with the old seeds for some additional days). However, today I decided to soak the old ones two days prior to starting the rest of the line-up. Reason: I guess, they will need at least 2 (maybe 3) days longer to sprout (if they do sprout at all, if they do it in such a well-behaved way that they can produce a strong seedling that I finally want to transplant into the patch). So, I hope that the entire line-up (we will see if it will eventually include one of today's first starters) will start as a seedling within a narrow time frame of about two days maybe, and then I can monitor their development as a seedling during their first days (prior to hitting patch soil) in direct comprison. Let's see how it works out...
|
|
|
Thursday, April 16
|
View Page
|
 |
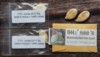
Starting more squash seeds today: 905* Bunge 25 (3x), 1083.6* Wagler 22 (6x), 1007.5* Wagler 21 (9x), 300* uow Wagler 21 (8x).
|
|
|
Wednesday, April 22
|
View Page
|
|
Seedlings updates: (1) Out of the 30 seeds started, all of them turned out to be alive. Never thought that would happen, especially because of the somewhat older seeds in the line-up. (2) 27 seeds went into pots. Just one 1007.5* and two 300*, which were a bit too late in the context of the better choice of available seedlings, did not go into pots. (3) From the two "oldies" (2 x 1844.5* Holub 16, 2 x 1709* Jutras 17), which were started two days earlier, the first seedlings emerged from the soil just a couple of hours past the peak period when most of the "youngsters" emerged. So, for growing the seedlings in a way of direct comparison, it was a good idea to start them two days earlier.
|
|
|
Monday, April 27
|
View Page
|
 |
Squash seedlings today :) For sure, there will be 10 seedlings for hitting patch soil in a couple of days. The oldies (1844.5* and 1701* are marked with a green H and a green J, respectively) don't look like racehorses yet, it's probably because of their age that the cotyledons had some troubles with getting out of the shell and flattening out nicely, but maybe...
|
|
|
Thursday, April 30
|
View Page
|
 |
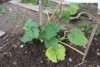
Seedlings went into the patch today. Transplanted, covered with frames, and...
|
|
|
Thursday, April 30
|
View Page
|
 |
...finally covered in their cosy huts :) As you can see, there are always two tunnels quite close to one another. Each tunnel accommodates two plants, the favorite plants of the outside...further apart from each other, and their back-ups are in the central part. So, in the case when I have to go with a back-up, there is still some good distance to the favorite plant of the adjacent planting site.
|
|
|
Thursday, April 30
|
View Page
|
 |
As you look "into the tunnels", from left to right (with respect to the previous pic), the racehorses are aligned as shown here.
|
|
|
Sunday, May 10
|
View Page
|
 |
Patch today :)
|
|
|
Sunday, May 10
|
View Page
|
 |
...and the little buggers in their tents ;)
|
|
|
Sunday, May 10
|
View Page
|
 |
The oldies (1844.5* and 1701*, I kept the strongest plant of each duo) are still in their pots in my greenhouse. My plan is to keep the 1844.5* (need to find a spot to grow the plant) and to use it as a pollinator on my 300* (the latter is a 927.5* Jutras x self).
|
|
|
Sunday, May 10
|
View Page
|
 |
My kids' plants (1007.5* Wagler), so this will be an interesting competition this year...
|
|
|
Sunday, May 17
|
View Page
|
 |
Patch today...no exciting difference, the past week had been too cold and too dark. From next week on, things will be getting better (I hope so).
|
|
|
Sunday, May 17
|
View Page
|
 |
Inside the huts...life had been slow, too. An additional leaf within a week, that's not a hell of a lot.
|
|
|
Sunday, May 24
|
View Page
|
 |
Patch today :)
|
|
|
Sunday, May 24
|
View Page
|
 |
My squash plants today...they are happy that they can enjoy full sun now :) Now I'm curious to see what my favorite plant of the 905* batch will be going to do. So far, it is at the 4th leaf stage...but there are more leaves. 1st leaf single, 2nd leaf double, 3rd leaf single, 4th leaf double...so, I'll keep my fingers crossed that it may stay a strong and aggressive plant but won't become a ribbon vine monster.
|
|
|
Thursday, June 4
|
View Page
|
 |
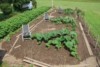
Patch today :) Last weekend I mowed and tilled the part with the mustard cover crop, and then I dug it over a spade deep.
|
|
|
Thursday, June 4
|
View Page
|
 |
My plants today :) In case of the 1083.6* and 1007.5* I am happy with both plants (in both cases, the back-up is just slightly behind, so a good plan-B...or maybe a hard decision in a couple of days). The 905*...oh well, my favorite plant is so much more aggressive, but it turned the direction of its main vine at a 90 deg angle, and the new growth looks more like going to become a ribbon vine (see next entry), but anyway, I will keep this plant for a while, maybe it will still be my beast of the year. Last but not least, my 300*, again the back-up is just slightly behind, but the plants are less aggressive than those of the 1083.6* and the 1007.5*. Maybe it is a sign that they want to grow fruit rather than salad?...time will tell.
|
|
|
Thursday, June 4
|
View Page
|
 |
My maybe beast of the year plant, the aggressive 905* Bunge plant, now it wants to go double and double and... hopefully back to normal soon, or turning into a 'simple double vine', where I can decide to keep just one out of two main vines.
|
|
|
Saturday, June 13
|
View Page
|
 |
Patch today...it's a bit cold right now (since a couple of days, and will be cold for the next 3 days as well), so the AG plants are a bit slow. Anyway, they are getting pretty close to each other, in a couple of days I need to remove some of the backup plants. Want to wait until the first males open, want to see that my keeper plants are fine (at least not sterile).
|
|
|
Saturday, June 13
|
View Page
|
 |
The 905* Bunge Beast ist still doing this twin thing. Well, one leaf node developed one leaf only, but then the double-leaves continue. Also, one secondary of this plant is an aggressive flat one, but the growth of the other secondaries (the ones that look okay shape-wise) is far behind. Still not sure what to do. Will wait for later...
|
|
|
Saturday, June 13
|
View Page
|
 |
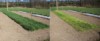
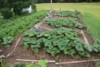
Let's talk about the much more satisfying side of AG-growing...the cover crops, they really grow nicely... Here you can see the half of the patch where the planting sites will be located next year. Around end of September the strip of potato plants will receive an oil radish cover crop. The other strip, next to the fence, is the final cover crop (which I will leave there to die of frost over winter), it consists of Serradella (the tiny green stuff that looks like weeds everywhere) and a pattern of Zinnia (red circles), tall marigolds (green circles), strips of buckwheat (orange ellipses) and alternating fields with empty centers or sunflowers in there (blue circles).
|
|
|
Sunday, June 21
|
View Page
|
 |
Just right before the time of endless yellow flowers commences, my frost hardi cacti decided to shine in the sun :)
|
|
|
Sunday, June 21
|
View Page
|
 |
Patch today :) This weekend I finally made the decisions as to who will stay and who will have to leave...at least for the 1083.6*, 1007.5* and the 300*.
|
|
|
Sunday, June 21
|
View Page
|
 |
In case of the 905* Bunge, a strong wind gust made an earlier decision. The flat main vine of the beast fell over and developed nasty splits, so I decided to cut it back to where a string single secondary grows into the rigt direction (as a potential new main vine). Just before throwing away the removed greenery, I inspected the flat vine tip (with its twin-leaf nodes)...and it would have continued that flat way for many many nodes, no sign of splittig into a "normal double vine" or of returning into the "single mode". So, I will (most likely) go with the backup plant, which is slightly smaller than my other plants, but it has a nice shape. The leftovers of the beast...I just want to see how they will be doing the next few days, and then I will make a final final decision.
|
|
|
Sunday, June 21
|
View Page
|
 |
Plants today :)
|
|
|
Sunday, June 21
|
View Page
|
 |
Guess what, this is my 1844.5* Holub plant (the better one of the two I had sown). Well, I kept it in the pot for a bit too long, and then I transplanted it into a corner of my patch where I just had removed some mustard (perhaps all three things...the longer time in the pot, the lack of nutrients at the new planting site and perhaps some influence of the decomposing mustard roots mad this plant go into hibernation for like two or three weeks). Also, I had to cover the plant with a little roof, because during its time in the pot the hypocotyl (where the red arrow points) opened, and now the "crown" consists of some kind of ribbon rather than a round stump. Anyway, this plant already had some males open, and I keep my fingers crossed that I can use it as a pollinator in about a week. Also, I will maybe grow a fruit on that little plant as well.
|
|
|
Friday, June 26
|
View Page
|
 |
Today first polination of the year, 1007.5* x 1083.6* (five lobes, main vine). It's the beginning of a heat wave (rising temperatures since a couple of days, culminating during the next two days), so I will use the time at home (because of weekend) to look after that little baby, watering the soil around the vine tips, adding some shading structures (garden chairs) around the main vine tip, running the sprinkler from time to time...
|
|
|
Monday, June 29
|
View Page
|
 |
Patch today... well, from a distance it doesn't look too bad. After a 3-days heatwave last weekend, we now received a downpour of 2 inches, wherefrom the first third crashed down within few minutes last night (accompanied by strong wind gusts), and the rest followed this morning, most of it within 20 minutes.
|
|
|
Monday, June 29
|
View Page
|
 |
Surprise!!! So many rocks, where have they been all the time? Ok, admittedly, they must have been there before, but where has all the dirt gone? The vine tips give a tiny hint. There's more of it under the leaves.
|
|
|
Monday, June 29
|
View Page
|
 |
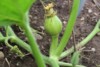
Pollination time!!! This is my kids' 1007.5* plant, you can see that beauty of a female (in camouflage look), and the orange-yellow shine of the petals clearly tells that this female will open tomorrow morning :)
|
|
|
Monday, June 29
|
View Page
|
 |
This is my 1007.5* x 1083.6*, 3 DAP, right after the heat wave. The past two days, I covered this part of the vine with two chairs and a large piece of cloth, which I tried to keep wet (cooling by evaporation) most of the time, adding some water with a can from time to time, and runing the sprinkler over the plant 3 times a day. Thermometer told me that I managed to keep the temperature around that female somewhat lower (by ca. 5 K) than the average shade temperatures in our area.
|
|
|
Monday, June 29
|
View Page
|
 |
300* x 1083.6*, 1 DAP, same procedure of cooling yesterday. Time will tell...
|
|
|
Monday, June 29
|
View Page
|
 |
Good times and bad times...oh well...didn't want to see the dirty desaster in my patch this morning, just went there for the sake of doing another pollination...1083.6* x 300*, such a beauty.
|
|
|
|